
Guide to creating and managing Profiles on InviBrowser
Creating a Profile is one of the first steps after installing and logging into InviBrowser. Each profile functions as a separate browser environment, allowing
Creating a Profile is one of the first steps after installing and logging into InviBrowser. Each profile functions as a separate browser environment, allowing you to isolate cookies, session data, fingerprints, and proxies for individual accounts or projects.
In this article, you will go through the following steps in order: create a Profile → set a name → assign groups and tags → select a Proxy → check the Fingerprint → open, edit, and delete a Profile.
If you have not installed the software or do not have an account yet, please review the detailed guide on downloading, installing, and creating an InviBrowser account to complete the basic setup steps.
Start your free InviBrowser experience to create your first Browser Profile and get familiar with the management interface.
What is a profile in InviBrowser?
Each Profile in InviBrowser is an independent browser environment with its own separate data and configuration. According to the official documentation, each profile can independently manage cookies, browser storage, browser fingerprints, and proxy settings.
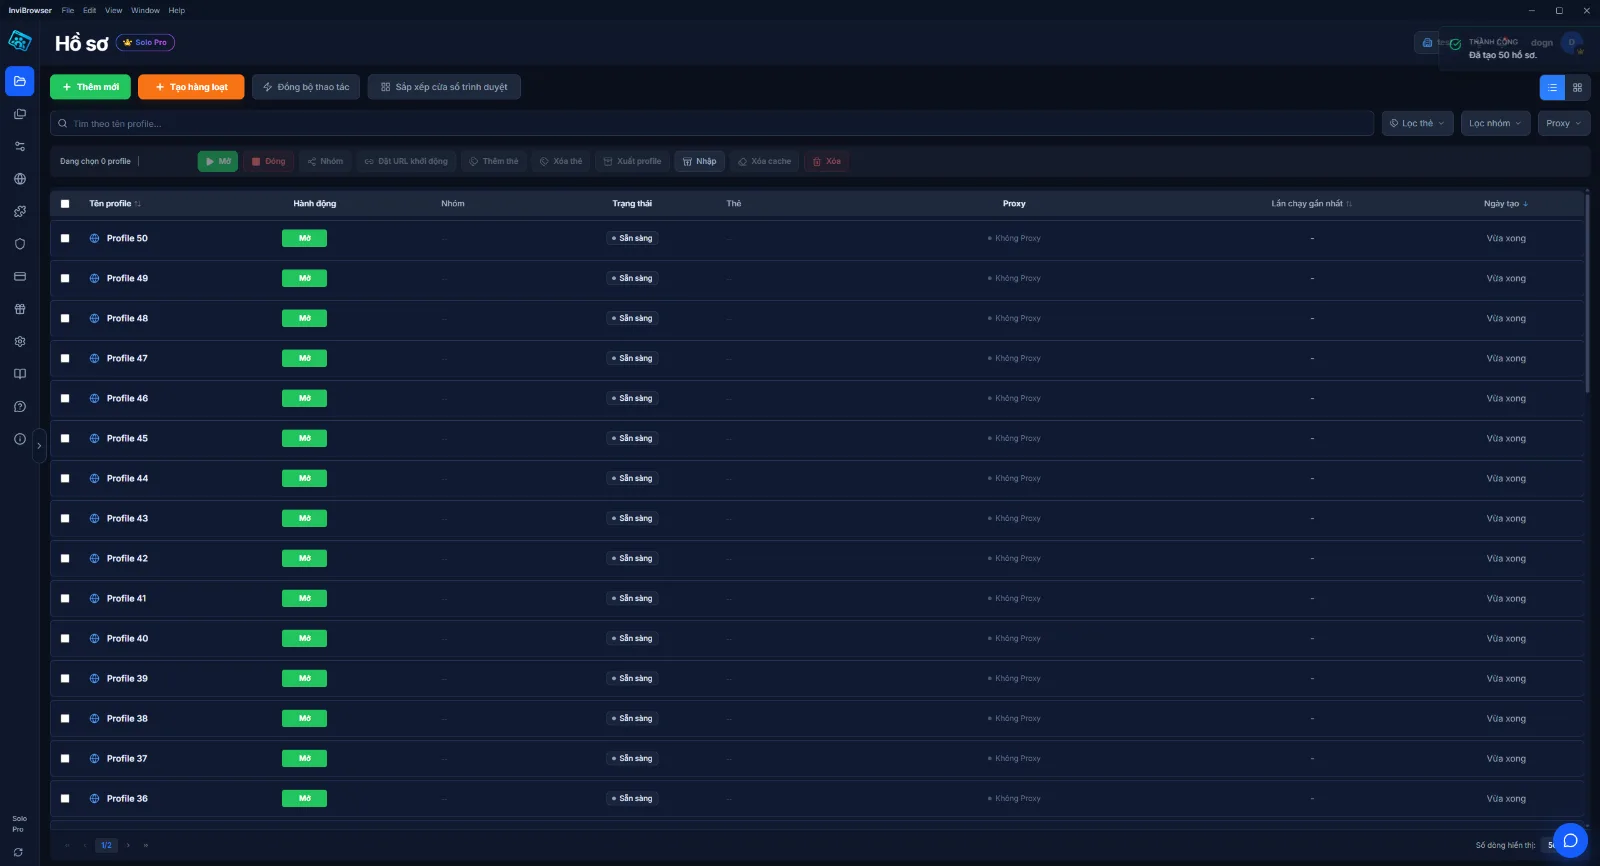
Instead of logging into multiple accounts in the same browser, you can separate each account or project into a dedicated Profile for easier tracking and management.
Example:
-
TikTok 01 is for the first TikTok account.
-
Facebook 01 is for the first Facebook account.
-
Project A - 01 for a specific project.
Get familiar with the Profile management area
After logging into InviBrowser, go to the Profile section.
Here, the Profile list displays information such as:
-
Profile Name.
-
Group.
-
Status.
-
Tag.
-
Proxy.
-
Last run.
-
Created on.
Each Profile has a configuration screen with three main sections: Overview, Proxy and Fingerprint.
How to Create a Profile on InviBrowser
Watch the detailed tutorial video here: https://youtu.be/fS9GLWJmHbQ?
Step 1: Select Add New
On the Profile page, click Add new.
InviBrowser will open the New Profile screen, where you can set up information for a new Browser Profile.
Step 2: Name the Profile
In the Overview section, check the Profile Name field.
The system may pre-fill a name, but you should change it to a more recognizable naming convention.
Example:
-
TikTok 01
-
TikTok 02
-
Facebook Client A
-
Shopee Project 01
If you manage multiple Profiles, you should establish a consistent naming convention from the very beginning to make future searching and classification easier.
Step 3: Assign Group and Tag
Right below the Profile name, you can use Groups and Tags to categorize profiles.
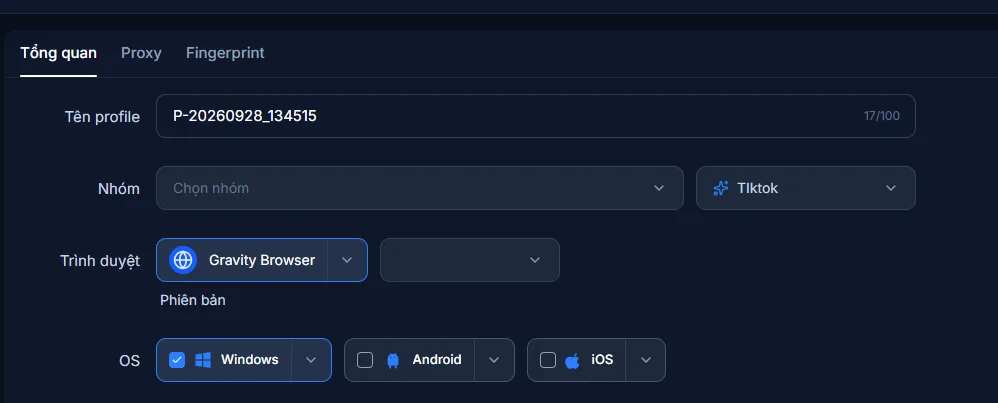
Groups suitable for segmenting profiles by:
-
Project.
-
Customer.
-
Team.
-
Responsible staff member.
Meanwhile, Tags are more flexible, and a single Profile can be assigned multiple Tags.
Example:
Group: Client A Tags: TikTok, Ads, Team 1
As the number of Profiles grows, assigning Groups and Tags from the very beginning will help you filter and find the right profiles faster.
Step 4: Check Browser, OS and User-Agent
In the Overview section, you can view information such as:
-
Browser.
-
OS.
-
User-Agent.
-
Startup URL.
The parameters displayed in each Profile are the configurations of that browser environment.
Please note that the OS options such as Windows, Android, or iOS in the Profile configuration section are parameters for simulating the browser environment, and do not imply that InviBrowser has a native app installed on all these operating systems.
Step 5: Select and Test the Proxy
If your workflow uses a Proxy, go to the Proxy Setup section.

For proxies saved in InviBrowser, the basic process includes:
-
Select Saved Proxies.
-
Select the Proxy you want to use.
-
Click Check Proxy.
-
Review the results before proceeding.
When the Proxy is active, the system can display the corresponding IP address and country information for your reference.
Testing the proxy before creating a Profile helps avoid the need to go back and adjust the configuration later.
Learn more: What is a Proxy? How Proxies Work and a Beginner's Guide to Using Proxies
Step 6: Review Fingerprint
Next comes the Fingerprint section.
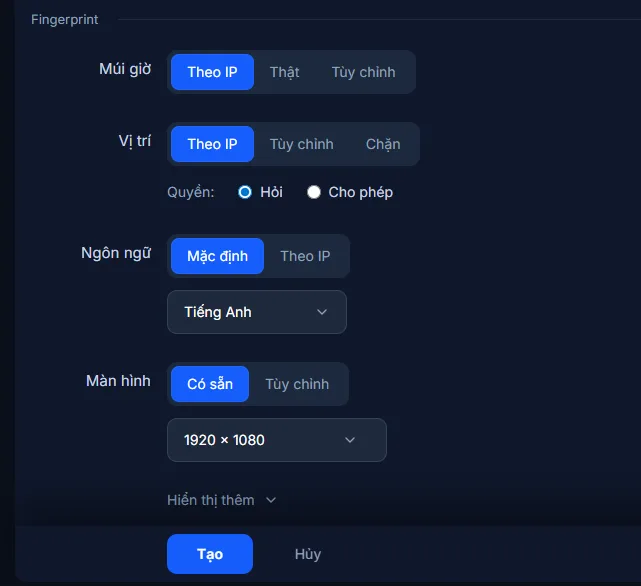
Here, you can check various parameters of the browser environment, such as:
-
Time zone.
-
Location.
-
Language.
-
Screen resolution.
-
WebGL.
-
WebRTC.
-
CPU.
-
RAM.
-
Canvas.
-
Fonts.
-
Audio Context.
-
Client Rects.
Next to the configuration section is the Preview area, which allows you to review the parameters before creating a Profile.
If you are just getting started, you do not need to manually adjust all Fingerprint parameters. It is recommended that you first understand how Profiles work before delving into advanced configuration.
Learn more: What is Browser Fingerprint? How does browser fingerprinting work?
Step 7: Create Profile
After inspection:
-
Profile Name.
-
Group.
-
Tag.
-
Proxy.
-
Fingerprint.
-
Preview section.
Click Create.
The newly created profile will appear in the Profiles list. Here, you can review the configured name, group, tags, and proxy settings.
How to open and check the Profile
To use a Profile, locate the correct profile in the list and tap Open.
The profile will switch to the launching state, and then the corresponding browser window will open.
When you are no longer using it, you can tap Close to stop the Profile.
How to Manage Profiles on InviBrowser
After creating Profiles, you can continue to manage them directly in the Profiles section.
Search and Filter Profiles
InviBrowser provides a name-based search box along with the following filters:
-
Tag.
-
Group.
-
Proxy.
If you have assigned clear names, groups, and tags from the outset, you will be able to find the correct Profile more quickly as the list grows.
Edit and Rename Profile
If you need to change the name or configuration, please stop the Profile first.
Then:
-
Open the three-dot menu on the Profile page.
-
Select Edit.
-
Change the required information.
-
Click Save.
-
Go back to the list to check.
According to the interface in the user manual, the currently running Profile must be closed before it can be edited or deleted.
Delete unused Profiles
To delete a Profile:
-
Select the Profile you want to delete.
-
Click Delete.
-
Check the number of selected Profiles.
-
Confirm before proceeding.
The dialog box on the interface warns that the deletion operation cannot be undone, so please check carefully before confirming.
Important Notes Before Deleting Your Profile
The user guide describes that the paid plan has a mechanism to back up deleted Profiles, while the free plan does not have recovery capabilities. However, the deletion interface still displays the warning "This action cannot be undone".
Therefore, for Profiles that contain important data, you should check the applicable policy for your current plan or confirm with the support team before deletion.
Other Profile management tools
In addition to creating and editing basic Profiles, the InviBrowser interface also includes tools such as:
-
Bulk creation.
-
Synchronize operations.
-
Arrange browser windows.
-
Set the startup URL.
-
Add or remove Tags.
-
Export Profile.
-
Enter Profile.
-
Clear Cache.
-
Clone Profile.
-
Move the Profile to the group.
-
Import or export Cookies.
These tools are suitable when you start managing a larger number of Profiles or need to standardize workflows for your team.
Learn more: Guide to bulk creating Profiles on InviBrowser if you need to set up multiple Browser Profiles instead of creating each profile manually.
Summary
Creating a Profile in InviBrowser involves the following key steps: enter a name → assign Groups and Tags → select a Proxy → review the Fingerprint → create and verify the Profile.
After creation, you can continue to search, filter, edit, rename, or manage multiple Profiles directly in the Profiles section.
See also:
You can try InviBrowser for freeto create your first Browser Profile and start organizing browser environments by account or project.